
Hey dolls! It feels good to be back. I will be posting here weekly now, giving you great tips and tricks on graphic design.
Today's tips are on shading fabric, and in this post I am going to give you a step-by-step guide on how to shade this plain sweater;

I will be using a method called the 3:2 method, referring to the ratio of shade to highlight. Follow the 10 easy steps to achieve a flawless look for your next project, or even if you are wanting to start out as a designer - I hope my posts will offer you the help and ideas you'll need!
Without further ado, let's move on to the short tutorial...
STEP 1
Base Layer

The base layer is your most important layer and must look perfect before you start to shade. Using the lasso tool, trace around the garment you want to draw and then in a new layer, fill the shape in. Ensure you are happy with the shape of your base layer, and there are no unwanted jagged edges or missing parts before you begin the shading.
TIPS:
Only use your reference image as a guide.
Use the circle tool to achieve neater "curves" for your base image.
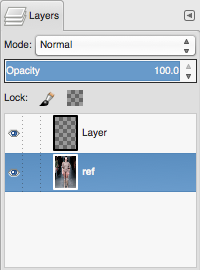
Be certain to draw your base on a new blank layer. Your layers window should look something like this;
STEP 2
Main shadow

This is where the 3:2 method begins to come into affect. Using the lasso tool, select all the major folds in the fabric. Then, using the brush tool, fill the area using a hard, black brush, setting the opacity of the brush to 10%.
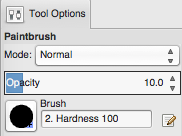
Your brush settings should look something like this;
TIPS:
To ensure your shading is fluid and not choppy, merge the folds together using smooth curves.
For darker fabrics, you will want to set the opacity of the brush higher, and for lighter fabrics, use a lower opacity for a more delicate shadow.
A lot of designers use a seperate layer for each layer of shading, but that is time conusming and can get confusing. It is much easier and simpler in the long run to do all your shading on one single layer.
Dont worry about your shadow layers going outside of the base layer outlines, we will trim them later.
STEP 3
Outer shadows

Next, we are going to add shadows to the outside of the garment. These are the shadows that fall from the top, sides, or bottom of the garment. Like the previous layer, they will be one connected shadow. Trace within the previous layer, defining the creases of the fabric. For this layer, you want to double fill the selection; this simply means filling the layer twice with the same brush (on the same settings) as the previous layer.
TIPS:
I often find that this layer can look wrong on the first try, so dont be afraid to keep trying until it looks right.
Be careful that your layers never overlap. This will give a messy finish.
STEP 4
Deep folds

For this layer, you simply want to shade in the smaller, more defining folds of the garment. This is the final layer of shading, and is intended for shading in the darkest folds of the fabric. Triple fill this layer to really define the areas.
STEP 5
Detailing and inner shadows

Since this is a plain sweater, there arent any "details" as such. But, we do need to add in the collar shading. You will only need to shade the sides and middle of the collar crease, it is not essential to have one conitnious curve from edge to edge as the highlight will match up the shapes. For this step, we are also going to add the inner shadows, these are the shadows that sit inside the garment and do not pass the outline. Repeat the methods in step 3 and 4 to shade these creases.
TIPS:
Use the circle tool as a guideline for a cleaner collar crease.
Some innner shadows may not require double/triple filling. Use your intuition, and your ref as a guide to have deeply you need to shade these areas.
STEP 6
Trimming

Simply trace the outline of your base layer where any shading layers have gone over the lines. Use the eraser to get rid of the excess shading.
TIPS
Zoom in as far as you need to get a precise finish.
Double check the entire outline of the garment to make sure you didn't mass any!
STEP 7
Main highlight

Now, using your reference as a guide, select the areas of the fabric that you want to highlight. These will usually be the parts inside of the shading layer and will roughly follow the lines of the shading we have already done. Set your brush to opacity to 15% and fill the area with white.
TIPS
For darker fabric, you will need a lower opacity highlight; usually no more than 10%. And for lighter fabrics, a more vibrant highlight is required; I often use opacity 20-25%.
STEP 8
High points

Highlighting the high points is fairly straight forward. Select areas within your previous layer and single fill them with the same brush. More often than not, your high points will be; shoulders, breast/chest area, and the odd large fold.
STEP 9
Highlighting detail

Simply higlight the collar, using a maximum of two layers. Make sure you highlight the centre of the collar to give it the illusion of being rounded.
STEP 10
Finishing touches
There weren't many finishing touches to add to this garment, except highlighting the ends of the sleeves. This is an important step though, as you can evaluate your work and see where you need to make tweaks. Looking carefully, you can see how the 3:2 method has come into affect as we have 3 layers of shading, and 2 layers of highilight. The 3:2 method is the most useful method when shading most fabrics - simple, clean, and effective.
And you're finished!
Thank you for reading my tutorial, I hope you learned a few tips and tricks.
Did you enjoy this post? Would you like me to continue posting tutorials?
What should be my next tutorial?
Thanks everyone!
Jailer x


